


GENERAL SPECIFICATION FOR FIXING ‘FUSION TYPE’ GLASS MOSAICS ONTO INTERIOR RENDERED WALLS (PART 2)
- ADHESIVE SYSTEM
- Mosaics with tessera smaller than 50mm
- Add 20kg TAL MARBLEFIX light-coloured rapid-setting adhesive to 5 litres of TAL BOND (replacing the water in the mix) and mix to a creamy consistency.
Alternatively, TAL BOND POWDER may be added to the adhesive mixing water at a ratio of 1 x 1kg sachet per 20kg TAL MARBLEFIX, or TAL MARBLEFLEX single-part flexible light-coloured rapid-setting adhesive may be used. When using TAL MARBLEFLEX no additives are required, simply mix with clean water, alleviating possible mixing errors on site.
- Add 20kg TAL MARBLEFIX light-coloured rapid-setting adhesive to 5 litres of TAL BOND (replacing the water in the mix) and mix to a creamy consistency.
- Mosaics with tessera larger than 50mm
- Add 20kg TAL MARBLEFLEX flexible light-coloured rapid-setting adhesive to 5 litres of TAL BOND (replacing the water in the mix) and mix to a creamy consistency.
Alternatively, TAL BOND POWDER may be added to the adhesive mixing water at a ratio of 1 x 1kg sachet per 20kg TAL MARBLEFLEX.
- Add 20kg TAL MARBLEFLEX flexible light-coloured rapid-setting adhesive to 5 litres of TAL BOND (replacing the water in the mix) and mix to a creamy consistency.
- Paper-Covered Mosaics
- The adhesive is applied to the surface in a solid bed of 4 – 6mm. The mosaics are pre-grouted by working adhesive into the joints between the mosaics from the back.
- Immediately, FIRMLY bed the mosaics into the adhesive on the background. A wooden beating block or rubber grouting float can be used to create a flat surface.
- Allow the adhesive to dry sufficiently, and then gently remove the paper covering on the mosaics with a dampened sponge. Excessive water must be avoided as this may compromise the integrity of the adhesive. If necessary, fill any voids or depressions with the adhesive mixture.
- Mesh-Backed Mosaics
- The adhesive is applied to the surface in a solid bed of 4 – 6mm. Immediately, FIRMLY bed the mosaics into the adhesive. A wooden beating block or rubber grouting float can be used to create a flat surface. Allow the adhesive to squeeze out through the joints between the mosaics to form the grout. If necessary, fill any voids or depressions in the joints with extra adhesive.
NOTE : The adhesive bed thickness should not exceed 5mm when using glass products which are 4mm or thinner.
- The adhesive is applied to the surface in a solid bed of 4 – 6mm. Immediately, FIRMLY bed the mosaics into the adhesive. A wooden beating block or rubber grouting float can be used to create a flat surface. Allow the adhesive to squeeze out through the joints between the mosaics to form the grout. If necessary, fill any voids or depressions in the joints with extra adhesive.
- General
- The adhesive is applied to the surface in a solid bed of 4 – 6mm. (The adhesive can be applied using a NOTCHED FLOOR TROWEL, and the adhesive then smoothed with the straight edge of the trowel to flatten the ridges.)
- Gently clean any excess adhesive off the face of the mosaics before it hardens .
- At no time spread more adhesive than can be tiled onto in 10 – 15 minutes. Depending on atmospheric conditions, this will normally be around 1 square metre. This prevents the adhesive from drying or “skinning” before the tiles are applied.
- Pot life of the adhesive will vary with climatic conditions. Under no circumstances should adhesive which has been left standing for too long be reconstituted by adding more liquid.
- Leave a ‘grout joint’ between the mosaic sheets, the same width as the joints between the mosaics on the sheets.
- Do not tile over structural, expansion or cold joints in the These joints must be extended through the various layers to the surface.
- Due care must be taken to ensure that glass mosaics do not get scratched by the adhesive during application and cleaning.
- Mosaics with tessera smaller than 50mm
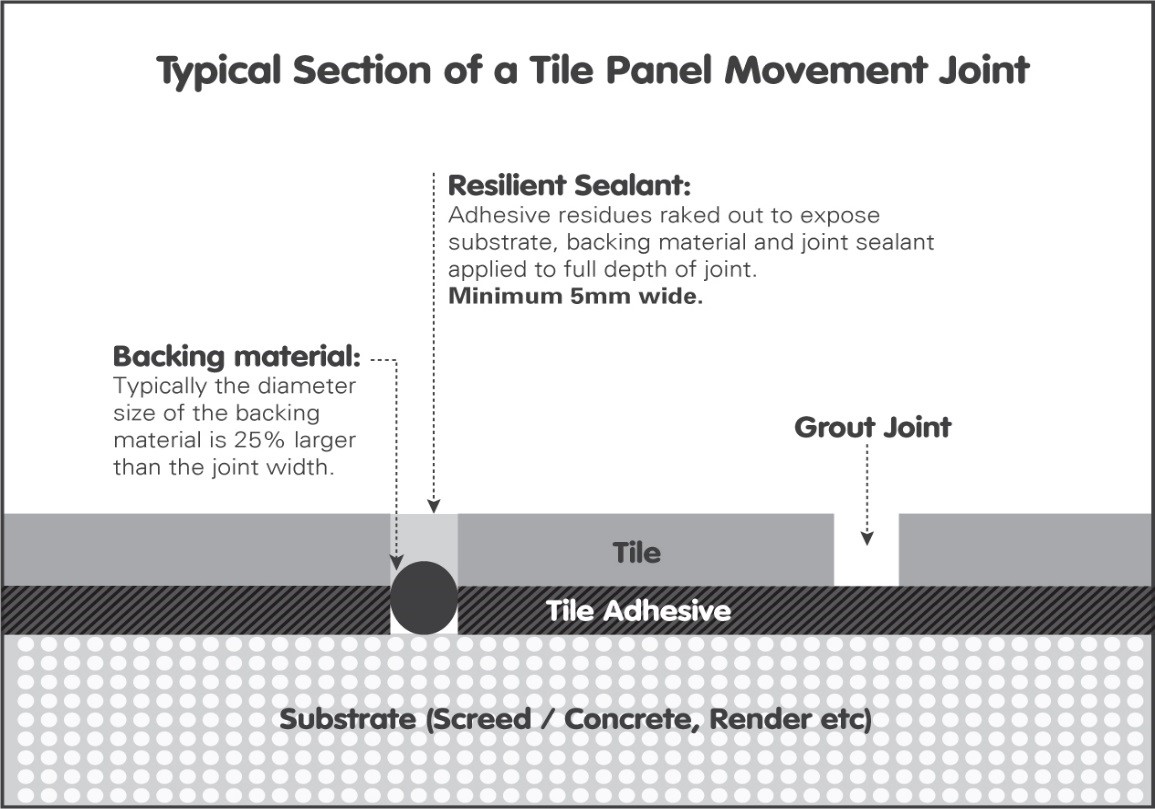
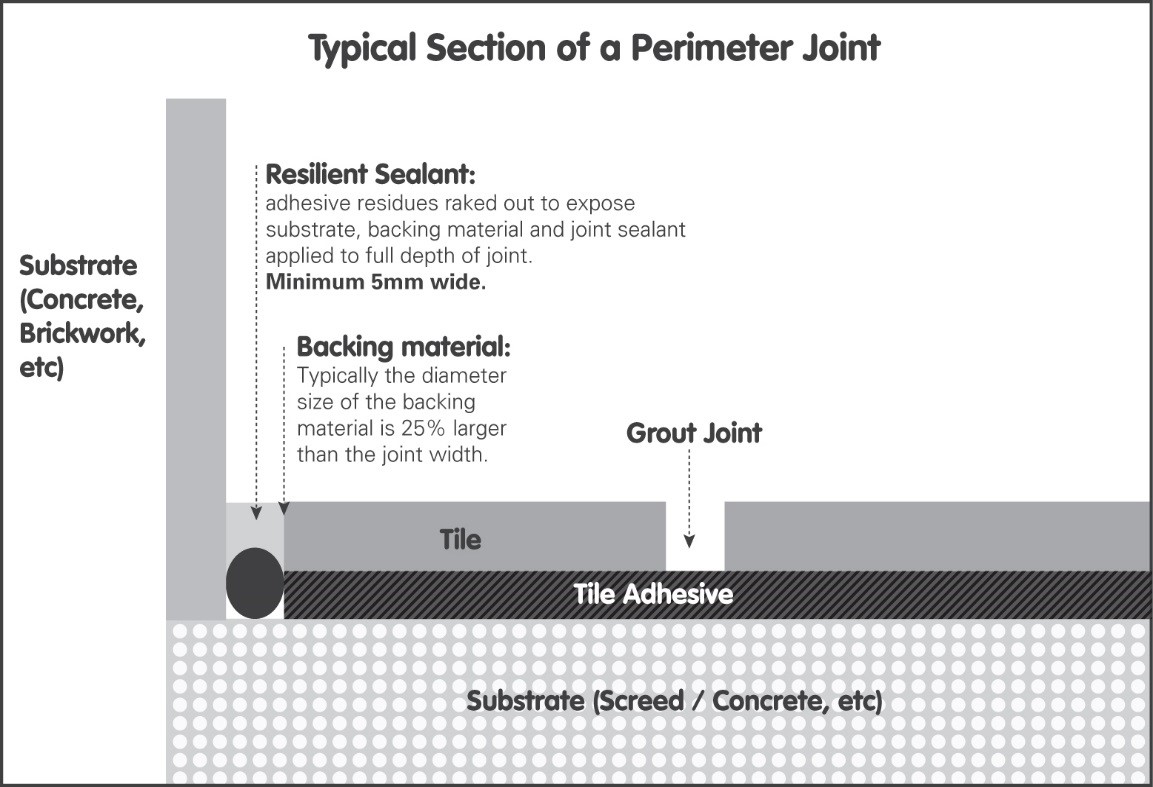
- MOVEMENT JOINTS
- It should be noted that the lack of movement joints in a tile panel is a major cause of tile failure. They should be specified at the design stage to avoid spoiling the visual effect of the tiles.
- Movement joints should be located in both directions at maximum 2 metre centres for this application.
- Movement joints should also be made in all internal corners and interfaces, against obstructions fixed to the structural background and over all discontinuities in building materials, eg at interfaces of concrete and brickwork. In addition, movement joints must be located around any fixtures protruding through the tiled surface.
Movement joints (‘soft’ joints) must also be created at the interfaces between glass mosaics and other finishes (ie other tiles, metal trims, etc). - The joints should be at least 5mm wide and extend through the adhesive and tile layers. All construction / cold joints and structural joints in the background must be extended through the adhesive and tile layers to the surface in the form of tile panel movement joints. With regards to structural joints, the full width of the structural joints must be respected and extended through the adhesive and tile layers to the surface.
- Where practical, the bulk of the depth of the movement joint can be filled with TAL SEALMASTER CORD.
- Seal the joint using TAL GOLDSTAR SEALMASTER 1000 Polyurethane Joint Sealant in accordance with the manufacturer’s instructions. It is important that the joint sealant bonds only to the sides of the movement joint.
- For the key requirements common to all tiling situations please refer to SANS 10107-2011, Code of Practice for the Design and Installation of Ceramic Tiling.
Should you require any further assistance or have any queries regarding the above, please do not hesitate to contact us. Assuring you of our best attention at all times.
Yours faithfully,
SHARON MARGON
TECHNICAL ADVICE SUPERVISOR
© TAL 1972 & 1984
Back to General Specifications
Previous Page 2 of 2