

GENERAL SPECIFICATION FOR SCREEDING / LEVELLING AN INTERIOR FLOOR USING
TAL SCREEDMASTER SELF LEVELLING SCREEDING COMPOUND (5mm THICK) PRIOR TO INSTALLING
RESILIENT FLOOR COVERINGS (page 2)
4. PRIMING
|
4.1. |
The floor must be swept to remove all traces of dust, debris and loose particles. (Vacuuming is preferred.) |
||||||
|
4.2. |
THE SUBSTRATE MUST HAVE A MOISTURE CONTENT OF 5% OR LESS BEFORE PROCEEDING. |
||||||
|
4.3. |
Woodfloated (rough, porous) Surface
|
||||||
|
4.4 |
Powerfloated / Steelfloated (smooth, dense) Surface
|
NOTE : Failure to allow the TAL FLOOR PRIMER coat to cure for 12 hours will result in bubbles / pinholes forming in the TAL SCREEDMASTER installation during the drying stage.
5. MIXING
5.1 Mixing – Manual Method
5.1.1 Add 22kg TAL SCREEDMASTER to 5 litres of clean water while stirring slowly with an electric drill of at least 1.1 Kilowatts with a mixing paddle attachment.
THE TEMPERATURE OF THE WATER MUST BE BETWEEN 15 - 25°C WHEN MIXED WITH TAL SCREEDMASTER. The mixing process and application should be
continuous. Mix thoroughly for 5 minutes until a smooth, lump-free paste is obtained. Allow the mix to stand for 3 minutes, and then stir again for 1 minute.
Stir occasionally whilst in use. DO NOT OVER WATER THE MIX. Do not mix up more than can be used in 20 - 30 minutes.
5.2 Mixing - Pump Method
5.2.1 Please refer to flooring contractor for mixing methods. (THE TEMPERATURE OF THE WATER MUST BE BETWEEN 15 - 25°C WHEN MIXED WITH TAL
SCREEDMASTER.)
6. TAL SCREEDMASTER APPLICATION
6.1 Pour the mix onto the floor and spread with a TAL NOTCHED FLOOR RAKE or a TAL ADJUSTABLE FLOOR SPREADER to the required thickness. (The size of the notch
of the TAL FLOOR RAKE or the height adjustment of the TAL ADJUSTABLE FLOOR SPREADER will determine the thickness.)
6.2 TAL SPIKED SHOES must be worn during the installation. Roll the area using a TAL SPIKED ROLLER to facilitate the release of any trapped air to produce a smooth
surface, and to allow it to dry.
6.3 TAL SCREEDMASTER should be applied in thicknesses exceeding 3mm to obtain optimum results. TAL SCREEDMASTER can be applied up to 16mm
thick in a single operation.
6.4 All construction / cold joints and structural joints in the background must be extended through the screed layer to the surface in the form of voided joints. With regards
to structural joints, the full width of the structural joints must be respected and extended through the screed to the surface.
6.5 Voided joints should also be located around the perimeter of all floors, against obstructions fixed to the structural background, and around all protruding fixtures
such as walls, columns and stairs.
6.6 In addition to the above, if the TAL SCREEDMASTER application thickness is to be 10mm or greater, bay divisions and voided construction joints should also be
incorporated in the screed layer as for normal sand/cement screeds and toppings in accordance with the SABS Code of Practice.
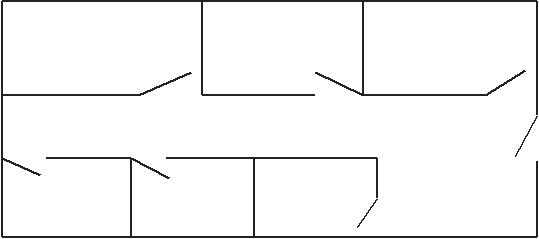
6.7 Ideally, all doors should be removed. Doorways should be blocked off with foam tape. It is normally recommended to apply TAL SCREEDMASTER before skirting boards
have been installed. If boards are in place already, these should be covered with masking tape to avoid staining with product. Apply product starting with all rooms (1)
and ending with the passages (2). Bigger rooms or areas could be subdivided into smaller areas using foam tape. This reduces the risk of cold joints. Once product has
set, the foam tape should be removed and all channels left behind should be filled with TAL SCREEDMASTER, and subsequently sanded down once set.
6.8 Note: Any lumps or unmixed product should be removed while product is still wet, normally done during the bubble bursting stage of the installation.
6.9 Should a further build be required, this can be done once the first application has cured for 24 hours. The surface must be primed with 2 liberal coats of TAL FLOOR
PRIMER. The second coat must be applied in a cross-direction to the first coat once the first coat has cured. The TAL FLOOR PRIMER application must be allowed
to cure for 12 HOURS before the next layer of TAL SCREEDMASTER is applied.
7. DRYING TIMES & SURFACE FINISH
7.1 New screeds should be protected from building operations and other trades until fully cured.
7.2 The floor must be left to cure for 24 hours, depending on site and ambient conditions. Before floor coverings are installed a further Floor Level Survey should be
carried out on the floor using a 3m straight edge, as before. Any highs must be identified and removed by rubbing using a corundum stone. Any lows must be filled using
TAL SUPERSCREED mixed with TAL SCREEDBINDER (replacing the water in the mix).
7.3 A moisture test must be conducted by the flooring contractor prior to installing vinyl floor coverings or epoxy coatings, as any moisture trapped below the flooring may
result in the installation ‘bubbling’.
8. RESILIENT FLOORING INSTALLATION
8.1 Carpet and vinyl floor coverings can be installed using TAL PROFIX PLUS, a modified high performance aggressive acrylic adhesive specially designed for the
installation of vinyl and textile (carpet) floor coverings including floor coverings with exceptionally coarse backings eg. needle punch carpeting, coir carpeting, etc.
(TAL PROFIX PLUS is NOT suitable for adhering carpeting that has been coated with a rubber or bitumen based wear-under layment.)
8.2 Stir well before use. TAL PROFIX PLUS should be applied using a serrated trowel to ensure optimum transfer of adhesive, as follows :
Vinyl tiles and sheeting and backed carpeting - serrated trowel with triangular notches of 1.5mm x 1.5mm with 4mm centres
Coarse, unbacked carpeting (eg needlepunch carpeting) - serrated trowel with triangular notches of 3.0mm x 3.0mm with 4mm centres
8.3 Allow the adhesive to flash off and become slightly tacky before applying the floor covering. Press the floor covering into place and roll all flooring (except cushion
flooring) with a 64kg three sectional flooring roller.
Should you require any further assistance or have any queries regarding the above, please do not hesitate to contact us.
Assuring you of our best attention at all times.
Back to General Specifications
Download the PDF
Previous Page 2 of 2